
You, like me, may have taught biblical studies, hermeneutics, and foundational Greek courses for many years. You, like me, may have become deeply familiar with the text, the stories, the methods, the paradigms. But such familiarity can actually tank your effectiveness as an educator: you may rush the introduction of the material, forgetting that your students are swimming through a tidal wave. Or you may be tempted to dwell too long in the land of the theoretical.
Using Bible apps like Logos in the classroom has helped me solve both problems: working through hands-on biblical exegesis questions slows us all down and forces me—in a healthy way—to make the theoretical practical. Having all of the students in class equipped with Logos provides a lab-type setting in a biblical studies class. There is a reason that other disciplines so frequently include labs as a required component in their courses. Labs focus on the tools and the tasks, and provide an environment of question asking and non-threatening correction.
In this piece, I would like to make some suggestions on what a Logos lab-type scenario could look like.
Practicing what you preach in biblical studies
I’ll state this forthrightly: I’m not sure it is worth it for you, professor, to require Logos nor attempt to use it in a classroom setting if you do not actually make use of it yourself for your own research. This is not to say that you need to be a Logos power user and have a vast and extensive library; but you need to know how to use some of the basic and intermediate features of the Logos app. Indeed, it is some of the most basic and long-standing features of the Logos app that will have the most immediate “bang for your buck” for your students (and for you).
Almost every year I get an audible, That’s awesome, from students when I simply show them how to link resources to scroll together. I get the same when I show them how to triple-click a word to open it up in a lexicon. Brand-new users find this convenience exciting, and these are things that biblical studies professors should know how to do—set the example. Logos provides plenty of tutorial videos, and there are a number of official and unofficial Logos trainers (like me) out there who recognize the value of Logos and want to help as many people as possible to make good use of the app.
The opposite of the above also holds true: you may be very comfortable with Logos—maybe you have been using it since the days of Libronix—and so you may be suffering from the ailment of familiarity. If this describes you as it describes me, you need to remind yourself continually that you have used Logos for years, but the student may be looking at it for the first time. We often incorrectly assume that younger generations have a greater familiarity with technology than they actually have. Yes, these students have never known a day without iPhones and high-speed internet, but this does not actually equate to automatic knowledge of more complex apps like Logos. Being the father of several teenagers, I’m often shocked at how often I need to help them with the basics of computer apps and desktop operating system features—and they are equally shocked at my lack of knowledge for mobile apps and social media (as well as modern culture in general!). Being whip smart with mobile apps and social media does not equate to natural smarts with desktop applications.

Assuming that you are committed to not only using the Logos app but bringing it into the classroom, the next thing to do is begin sprinkling Logos within your classroom time (however your classroom time may look). My students know that I always have the Logos app open on my laptop in class, because I’m frequently sharing my screen with them. This is a relatively simple but, I think, effective modeling strategy.
If you have thought of a passage from the Scriptures or perhaps a quotation from a book in the Logos app and you are about to share it with the class, take the extra step and share your screen even before you have gotten to the passage. Show them the steps you take to locate the section you have in mind. It may be as simple as typing in the Scripture passage. But if you are like me and seem to slowly be losing mental capacity for recall, show them how you find it. This shows them that you’re human, but also that Logos provides easy ways to find what you are looking for. For example, if it is a biblical passage, opening the search tool and using the Bible search tab provides an opportunity to show how to search for phrases or combinations of words, and to use the fuzzy search results if you are still having trouble locating the correct passage. Or if you are looking for that juicy Richard Bauckham quotation that you highlighted in the Logos app last year, show them how you can search your entire library, but restrict the search to only highlighted text (and if you didn’t know you could do that, you’re welcome!).
Another way to sprinkle Logos into the classroom is to ask students at times to quickly do searches or quick tasks in class on your behalf. This often becomes a fun little race to see who can get the information first. For example, in a recent class in Matthew I asked them to do a quick search of “the crowds” to identify when this collective character appears. Another time we compared the verb used in the baptism scene for the heavens parting with the other synoptic gospels. Finally, another recommendation you can make to your students is to take their notes in the Logos app. This allows them to attach class notes directly to verses in the text. Assuming we successfully mold them into lifelong Logos users, this will make their class notes that much more useful in future study.
Logos in a lab-style classroom setting
There are a couple of tips and considerations I would like to suggest for those who desire to move forward with lab-style time with the Logos app in your classrooms. First, unless there is a specific place in your school’s curriculum for introducing the basics of the Logos app, it is best to assume no knowledge at the outset. This should result in a couple of very deliberate practices on your part, all of which will feel awkward but are very important.
First, you need to narrate everything you are doing, and do these things at a slow pace. Don’t say, “Okay, open your Bible and type in Mark 1:1.” Say, rather “Open Logos by clicking the icon in your applications folder. You see that my Logos app has opened with an empty window, yours may have done so, or it may have opened to a home window with many items on it. On the top left corner there are several icon menu buttons. The fourth button in looks like a little bible with a cross on it—click that to open your Bible.” Obviously this level of specificity will lessen over time, but in beginning sessions it will be very important.
Second, especially in early sessions: perform many of your actions at least two times. In the example above I would explain the fourth button location and click it. I’d then pause for a couple of seconds, then hit ⌘ + W/Ctrl + W to close the Bible panel I had just opened—and then I’d open it again, narrating my steps again.
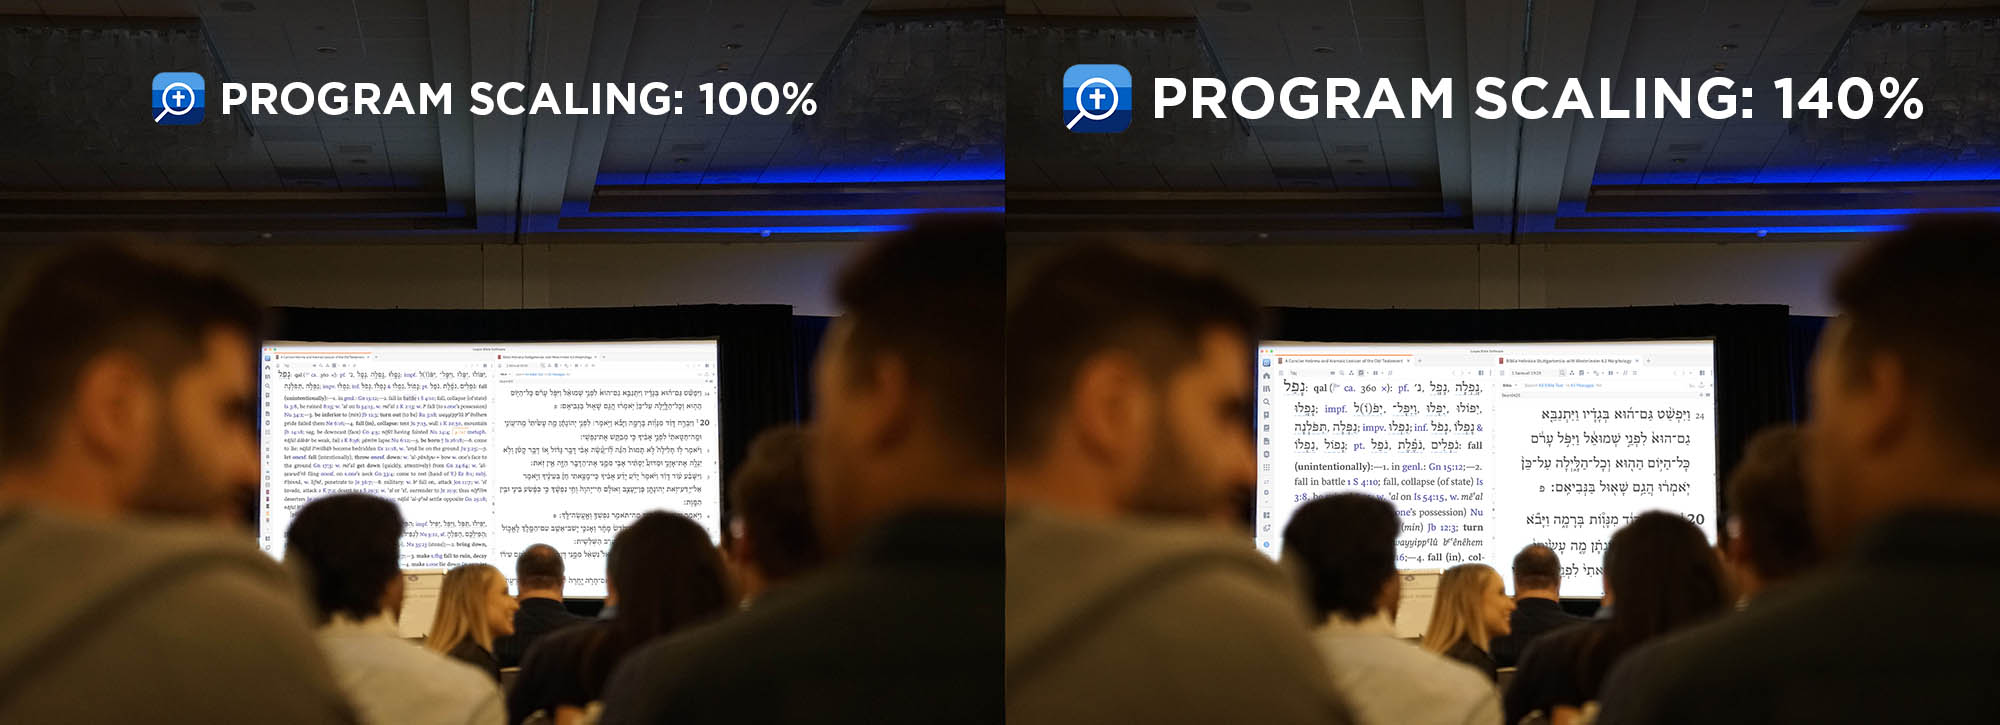
I’m assuming that in this lab-style class you are sharing your screen and that each student is on their own laptop. So you need to remember that the student will be performing rapid-eye movements between their screen and yours. To ease this process for the students, I recommend a couple of tweaks to your computer during this session. First: increase your cursor size in the settings of your computer: this will allow them to more easily follow what you are doing on screen. Second use the app’s program scaling to increase the size of all of the text. This can be done easily in the program settings.
(There is also a small feature in the program settings menu that allows you to draw on the screen quickly with your mouse–this may come in handy during a class.)
This next suggestion is directed to those who are more seasoned Logos users. It is a bit more of a hassle for the professor, and you will need to ultimately decide if it is worth it for you or not. You need to decide whether you should run an identical Logos app install as your students. Using my situation as an example: I have a very large Logos library and the full feature set. When students come into our programs, they are alerted to the Academic Discount Program Logos offers to students. From there, students are asked in particular courses to purchase particular resources depending on the class. This makes for a massive disparity between what I show to them and what they have installed. This can cause confusion: search results on the screen are fuller; resources are more numerous; results in guides and the Factbook are different; etc. There have even been situations where I was showing my students something in the Logos app but forgetting that it is part of the full feature set.
On the one hand, this minor flub exposed my students to the power and potential of the Logos platform. But a lab-style class is not supposed to be a sales pitch; I’m supposed to be helping them to use the tools they actually have in hand. The last time I had a more lab-like environment, I made the choice to create a new Logos account and purchase the Academic Basics. I then was able to sign into my Logos app using this account, running the same Academic Basics install as my students. The good news is that Logos makes it easy to switch between profiles in your user menu. If I have occasion to teach an introductory course like that again, I suspect that I will do the same thing to aid those who are entirely new to Logos, at least for the first few times until they become acquainted with the app. If you are a Logos veteran and choose to do this, be sure to re-acquaint yourself with the more basic install of Logos.
Activities in a Logos lab
Keeping the aforementioned tips and suggestions in mind, I recommend that you cover at least the following basic components before moving to more specific tasks:
- Show students how to find and open books and Bibles.
- Show students how to search their libraries, how to search Bibles, and how to search within individual books (with ⌘ + F/Ctrl + F).
- Explain all the “big buttons” in the top left of the Logos app window. (For the search, this means looking, at least briefly, at the various search tab options.)
- Show students how to create a link set so Bibles and commentaries can scroll together.
- Show them how to highlight text and how to attach a note to a Scripture passage.
- Demonstrate how to pick a Top Bible and make it their default translation.
- In a reverse interlinear (most English translations on the Logos platform), walk through the various sub-sections of the right-click contextual menu when you click on a word.
- Show how to navigate to a passage as well as to do an inline search in a Bible tab.
- Demonstrate how to drag different resources from the library to create custom layouts—and save them.
In addition to the above basics, it might be worth helping students look through their libraries all together, particularly if everyone is beginning with the same subscription. (This is also an opportunity to suggest hiding certain resources, such as some of the older, dated sources that come in free versions of the Logos app, resources that I prefer students not use in their research.)
If you do not know the Logos app well but are committed to learning it better, you can use existing videos that introduce basic features. The advantage of this is that you alert students to resources that they can go back to for review. Quickstart videos are available in Logos platform. To see even more brief training videos, open the Media tool in Logos and in the menu, choose the “Logos Training Videos” media collection.
Once you cover some of these basics, I suggest focusing on specific tasks and then working through the features in the Logos app that are best suited to fulfill that task. If you choose the task of a word study, for example, the Bible Word Study guide is the most comprehensive feature. But getting to that Bible Word Study window can come through many avenues. Show students how to launch a word study from their English Bible as well as how get started via the Factbook.

Another task to work on is how to study a background topic. The Factbook or Topic Guide can both help to do this, but be sure that students understand how to launch this type of research directly from the biblical text.
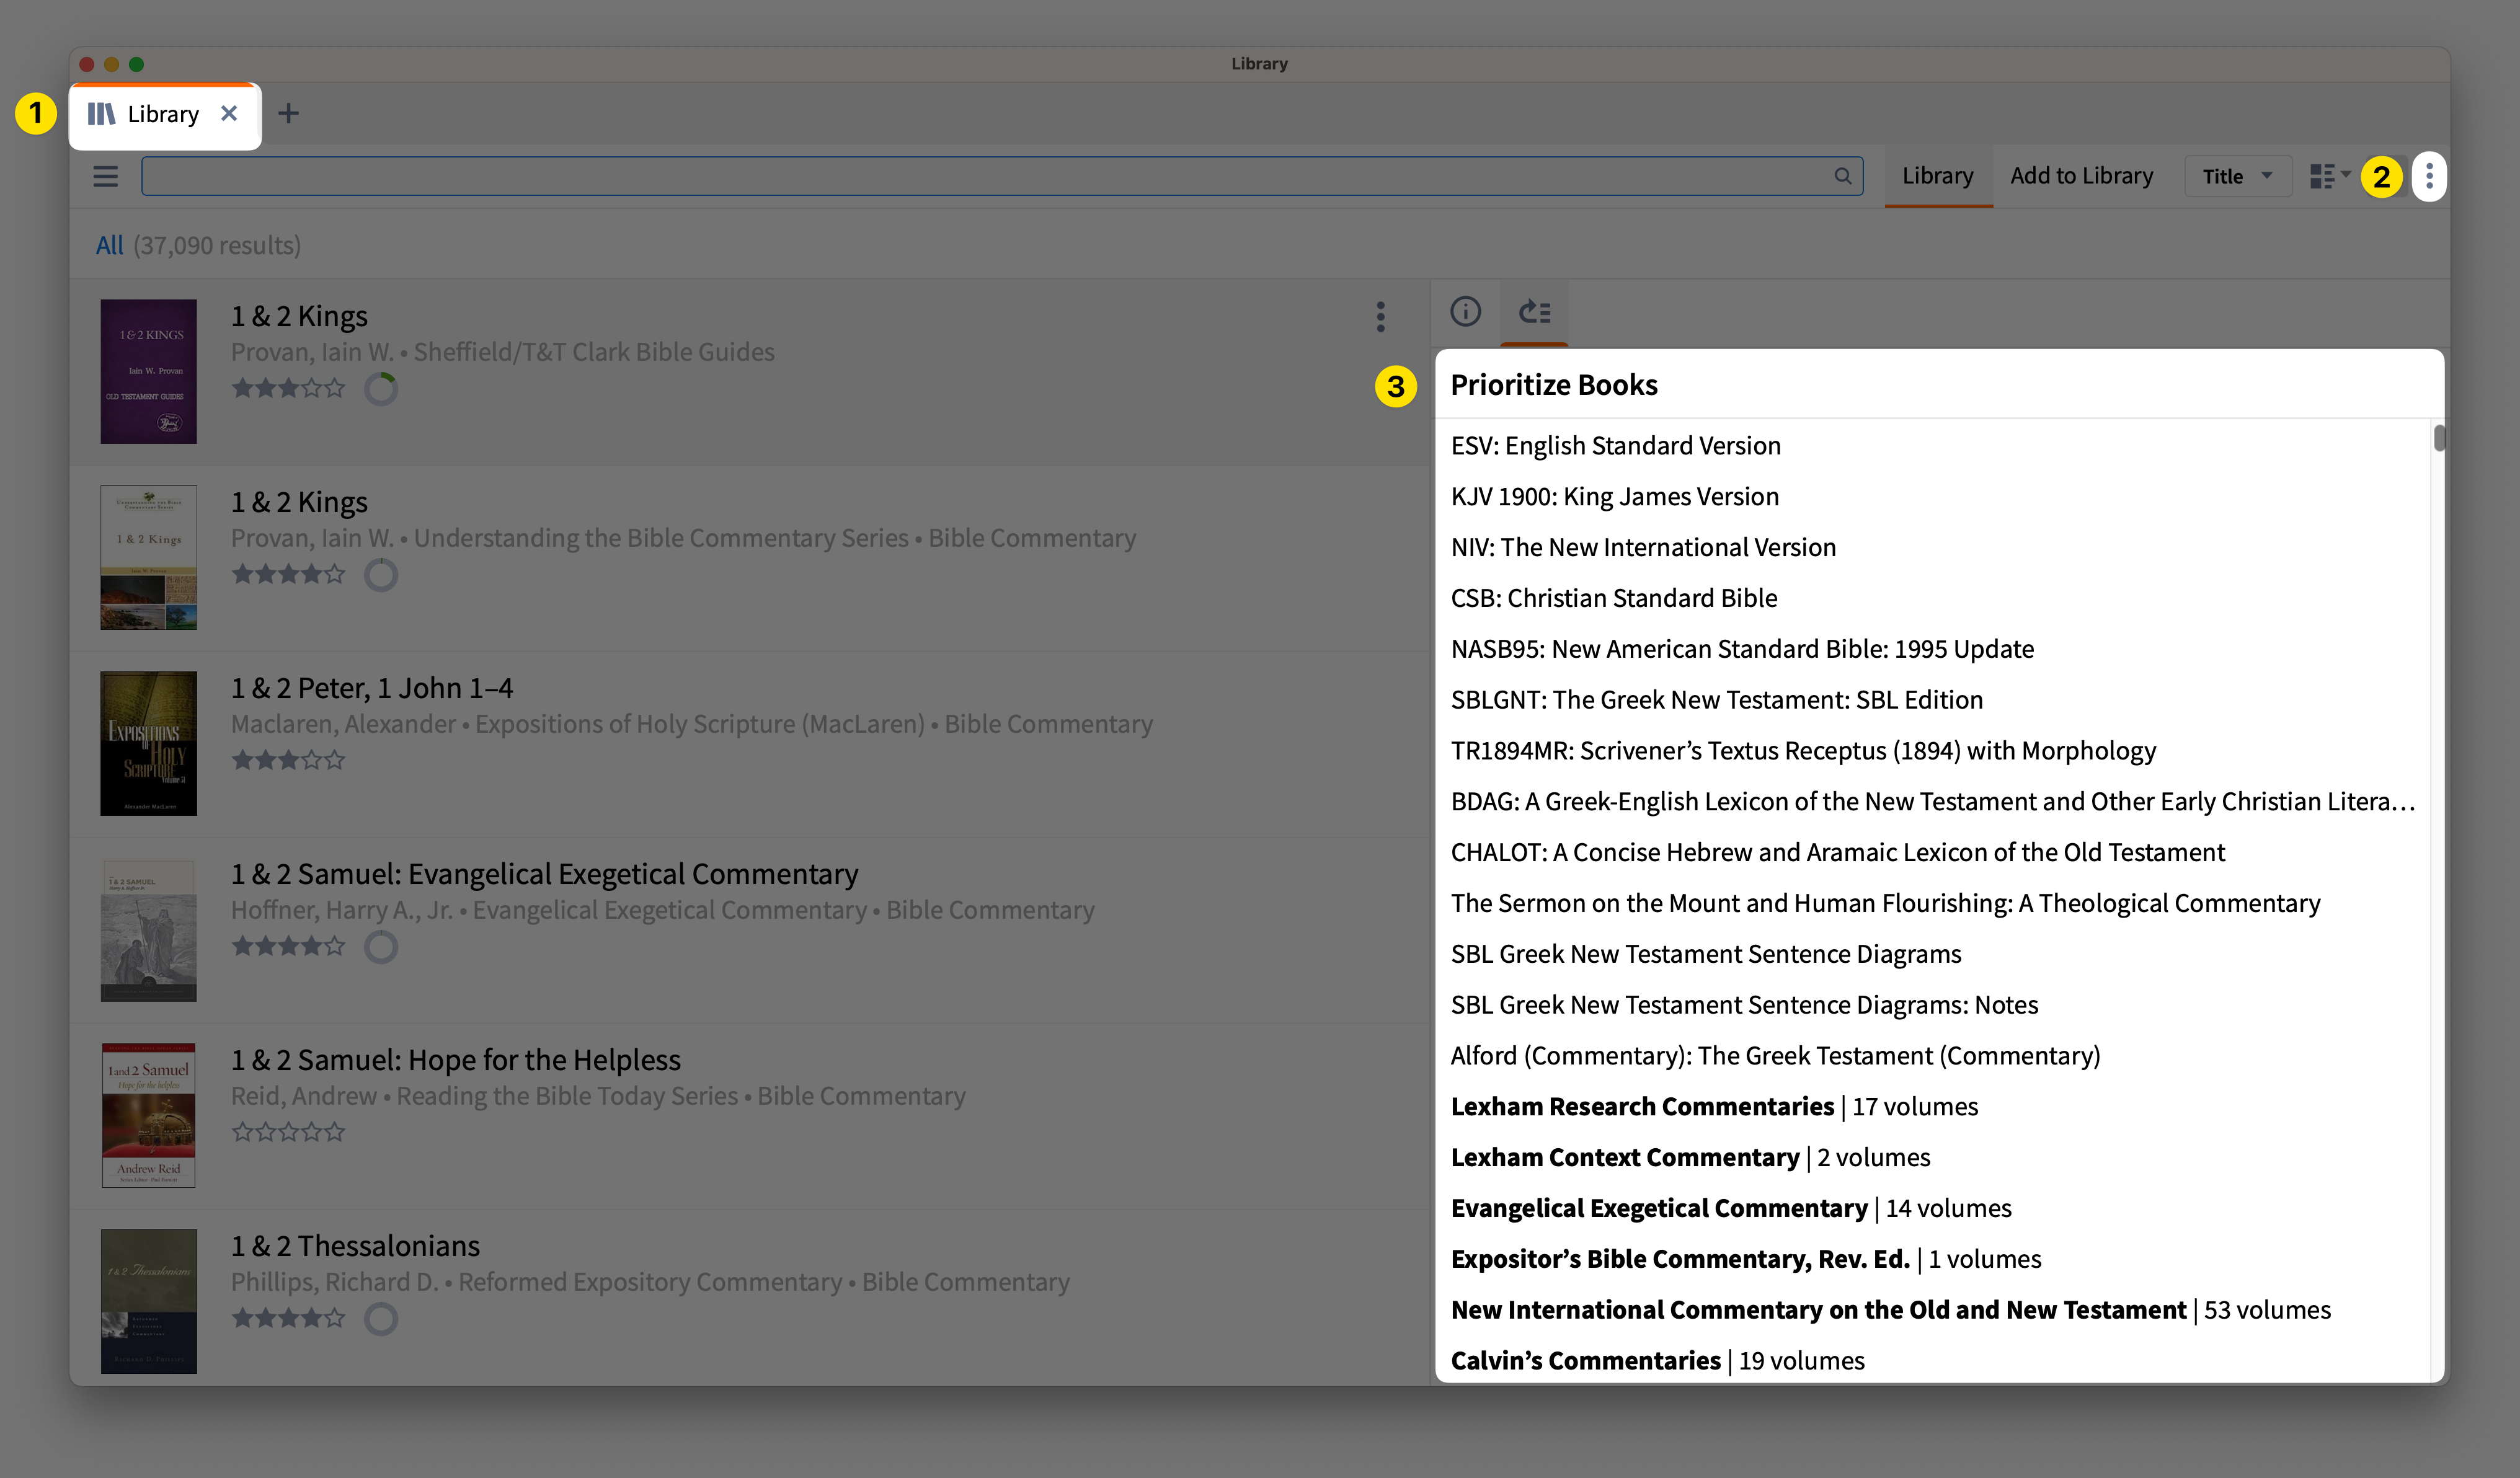
These first two example tasks will also provide opportunity to teach them how to prioritize specific resources in their library, like a preferred lexicon or Bible dictionary. (Just ❶ Open the Library tool, ❷ click the menu and select Prioritize Resources, then ❸ drag resources from the library to your preferred place of priority on the list.)
I suspect that many of us will be focused on responsible exegesis. This process, of course, involves lots of tasks brought together into a methodical process. Depending on the method you teach, choosing each component of the exegetical process and doing the task over and over on many different texts could be a helpful method. For instance, I used Michael Gorman’s Elements of Biblical Exegesis for class and expect students to follow this method. One element in the process is identifying the literary and rhetorical context. Logos users can read or skim the whole of the book that their passage is in. They can then also use the Passage Analysis tool to see the pericope titles at a glance and to get a sense of the entire book. They can also go to the Factbook and type in the title of the biblical book, and the Factbook will provide an Event outline for the biblical book. And in the Bible Book Guide section (an upgrade feature), the Logos app will bring together any outlines for the biblical book that may reside in the student’s library.
After students get more comfortable with the basics of Logos, you can begin to work through more complex material in a Logos lab. The Passage Guide is one that you can work through in a lab setting and will draw upon much of their library; but you will see that the guide is often quite empty because students have a limited version of Logos. A Logos workflow is another way to work step by step through a complex process. This is an excellent feature that can provide prompts for users to methodically work through an exegetical process. For beginners this is particularly beneficial. I have created a very specific workflow based on the exegetical process that Gorman teaches. I then shared this workflow to the public sharing within Logos, and my students (and anyone else) can download and use this workflow in Logos. This reinforces the method taught in class reading and assignments. I use the workflow in class, but I also allow students to export the workflow document as a PDF as part of an assignment submission.
Logos is a toolbox full of tools. Providing not only the tools, but also the training on how to use the tools enables professors to bring a physical learning process into biblical studies courses. Sprinkling Logos into the classroom setting allows professors to model Logos usage in small ways, and a lab-type class provides opportunity for hands-on experience in working with the biblical text.
Related articles
- Teaching an Excellent Seminary Lesson Starts with This
- Reclaiming Joy in Teaching
- Relying Upon God in Teaching Ministry
- Teaching as Ontological Formation


