You’ve just received Logos 4. You’ve waited patiently while your resources are installed and indexed, and looked through some of the exciting videos that introduce you to Logos’ great features. You’ll find Logos is incredibly powerful, and the possibilities of study are endless! You’ve probably got hundreds or even thousands of resources, dozens of tools, and millions of words. So where do you start?
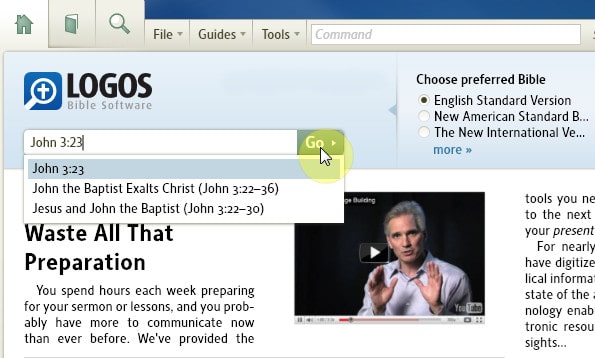
You’ll be glad to know that Logos has some wonderfully simple tools which pull together the most relevant information from across your library and present it to you in a matter of seconds. If you’re taking your first steps in Logos 4, there’s one tool you’ll want to make your first port of call—the ‘Go’ box on the homepage.
To use it, just type in the Bible passage you’re interested in, and press go.
When you’ve done so, Logos will take a few seconds to draw together many of the resources in your library. You’ll see five panels, each containing one or more tabs.

- The panel in the top right constantly updates with information about the word your mouse is currently hovering over.
- The panel in the lower right shows the Bible passage you’re studying in five different versions.
- The middle panel at the top contains five tabs, each with a different English Bible opened to the passage you’re studying. You can view the different bibles by clicking on the tab heading.
- The lower middle panel shows one of your Bible commentaries, again open to that passage. As you move around your Bible, the Commentary will automatically move to the same passage (because they’re linked).
- The left hand panel has two tabs, each containing an abundance of additional links and information. These two tabs, the Passage Guide and the Exegetical Guide, are a gateway to dozens more resources from the rest of your library.
If you want to, you can change which Bibles and commentaries are shown when you press ‘Go’ (it’s called prioritizing), and customize the passage and exegetical guides. But for now, let’s explore the two guides in the left hand panel.
The Passage Guide is designed to give you a broad understanding of the passage you’re looking at. There are a lot of useful sections, but probably the most important is the Commentaries section, which lists all of your commentaries for this passage. Just click on the name of the commentary to open it to exactly the right place.
One of the great things about this section is that it will often tell you about resources you might not know are relevant. I probably wouldn’t guess that the Nicene and Post-Nicene Fathers First Series, Volumes VII and XIV were relevant to a study on John 3:23, but they actually contain Augustine’s and John Chrysostom’s homilies on John, and so they’ll very usefully show up in the Passage Guide (the Church Fathers come with Scholar’s Silver or above).
On the other hand, the Exegetical Guide is designed to give you a detailed understanding of the grammar and words in the passage. There are several sections, and one of the most important is called Word by Word, which is available in most base packages.

As its name suggests, this section of the Exegetical Guide gives you a breakdown of every word in the passage. At the top of the section is the verse in English and Greek (or Hebrew). Just click on any word and you’ll be taken to the sub-section of the report with even more detailed information:

On the first line you’ll see the word’s dictionary form (called the lemma) both in the original language and transliterated (transliteration means each letter of the Greek/Hebrew word is substituted for a letter from the English alphabet) as well as the gloss (a short dictionary definition). If you have Scholar’s or above, you’ll even be able to hear a pronunciation of every Greek word by clicking the speaker icon.

On the second line, the word will be parsed. This gives you a breakdown of the word’s characteristics: whether it’s a noun, verb, or something else; whether it’s singular or plural; first, second or third person; and so on. And if you’re not sure what any of the characteristics means, just hover over it for a definition.

The rest of the subsection gives you links to all your lexicons (Greek and Hebrew dictionaries) for that individual word—the lexicons will open to exactly the right place when you click on them.
You can see how Logos doesn’t just provide you with hundreds of useful resources, but also gives you incredibly powerful tools that draw together masses of information in an easy-to-understand and manageable format. The ‘Go’ button is by no means the only tool in Logos, but it’s a great place to start your studies. To find out even more, or to reinforce what you’ve learned, why not watch this tutorial video, from covers everything in the post, and more:
Today’s guest post is by Mark Barnes, pastor of Bethel Evangelical Church in Swansea, UK, and author of the Unofficial Tutorial Videos for Logos 4.
Have a question for Mark about this blog post? Let us know in the comments.