I’ve been working through 1Ti 4.11-16 in my personal study. One thing that jumps out in this passage is the amount of imperative verbs relative to 1Ti 1.1-4.10. These six verses contain 10 imperatives; nine of them are in the second person singular (thus likely addressed to the reader, Timothy).
This is an important feature of the passage (and in the larger discourse of the epistle), and it should be looked into.
But how does Logos Bible Software help you become aware of this sort of thing? There are two features (at least) that help one “see” these things. Visual Filters and Verb Rivers. These are available in the Biblical Languages Addin, which is already a part of some Logos packages (see bottom of this product page for details).
This article explores what sort of information these addins convey.
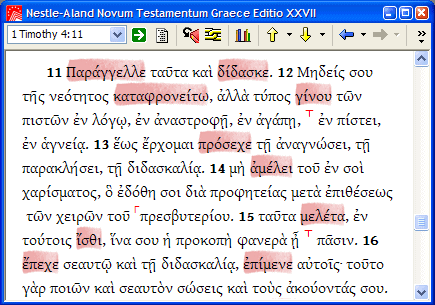
Let’s start with Visual Filters. In Logos Bible Software, a “Visual Filter” is visual information of some sort that automatically filters the text window, allowing things that you specify to jump out at you. The easiest way to describe this is with a picture appropriate to the discussion. Let’s say that, like me, your Greek morphology skills aren’t perfect. It might be helpful to specify different ways for different morphological criteria to display. In our current example imperative verbs it might be helpful to have all imperative verbs display with a red background. This way you can see them immediately without having to read/parse the text, or poke through morphology codes in an interlinear. Like this:
You can see the imperatives immediately, count them easily and track their usage and import in the passage. And the cool thing: Any morphological criteria that you can specify in the morphological search dialog can be used as a morphology filter. In fact, the morphology filter uses the same dialog component to specify morphology for the filter, so it is just like specifying information for a morphological search.
You can set up a morphology filter with the following steps. Note that this process is also detailed in a Case Study published on the Logos web site, Using Libronix as a Teaching Aid in Introductory Greek Courses.
First, since there are a number of different resources that the morphology filter can be used with in any given library, you need to activate the morphological filter for your current text. I should note that this process was recorded using an alpha version of Logos Bible Software, but the steps and dialogs are largely the same in the currently shipping version of the software.
- Open the text you want to specify a morphology filter for. Note that only morphologically tagged texts are available to be used with the morphology filter.
- View | Visual Filters
- Select Morphology Filter from the list of available filters.
- Click the Add button. Now the morphology filter is available to use with the specified text.
Next, you specify the morphological criteria and the preferred display. So, click the Details … button on the far right of the Visual Filters dialog.
- This step is optional. You can type a name for this filter inside of the Name: box. I typed “Imperative Verbs”. Note also that the Data Type: is deduced automatically.
- Next, check the appropriate boxes to represent your morphological criteria. For imperative verbs, select the Verb box in the Part of Speech section. Then select the Imperative box in the Mood area of the Tense, Voice, Mood section.
- Click the Add button (lower left portion of dialog, top button). The morphological criteria will be inserted into the reference list box.
Your dialog should look something like this:

Now that we’ve selected the morphological critera, we need to specify a display. Depending on your installation of Logos Bible Software, you may have different “Palettes” for morphological filters available. There are basically three steps:
- Select your Palette. Since I just want the background red, I select the Highligher Pens palette.
- Select your display option. Since I just want the background red, I select the Red option (convienently previewing the markup it will generate) from the list.
- Click OK.
Once you click OK, the filter will apply itself to the text. In the alpha version of Logos Bible Software, this means that it will look like someone took a red highlighter and went through and highlighted all of the imperative verbs for you. Pretty cool, huh?
I’ve run long (again …) and haven’t been able to discuss Verb Rivers yet. I’ll do that in a subsequent article.