One of the great features in Logos Bible Software 4 is the Bible Facts tool, otherwise known as Biblical People, Biblical Places and Biblical Things. These three tools come with most Logos 4 base packages, and gather an immense amount of information from across your library in seconds. If you’re interested in a person, place or even a “thing” in the Bible, then these tools should be your first port of call. In this tutorial, we’re going to concentrate on Biblical Places (but Biblical People and Things work in just the same way).
Accessing Biblical Places
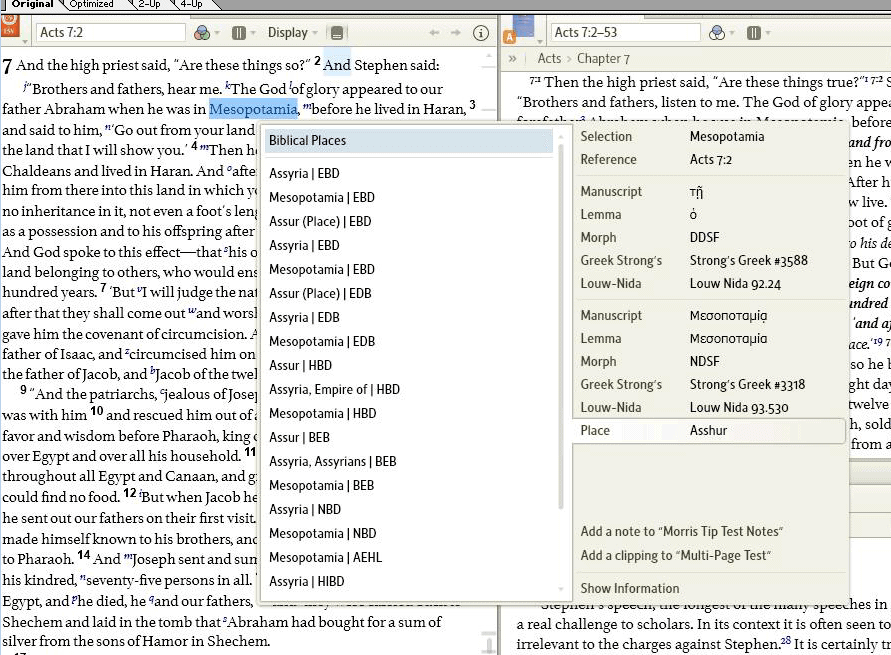
There are four ways to get access to Biblical Places. The easiest is to choose Biblical Places from the tools menu and then type the name of the place you want in the Biblical Places reference box, or use the Passage Guide (if the passage you’ve chosen mentions a place by name). Advanced users sometimes prefer to type “open biblical places” or even “open biblical places to Antioch” in the command bar. But another great way to access it to right click on a place name in most Bibles, make sure that Place is selected on the right-hand side of the menu, then click Biblical Places on the left. (Click on the images below to see them full sized.)
A Wealth of Information
Once Biblical Places is open to the place you’re interested in you’ll find it incredibly easy to access a wealth of information about that place.

In the top ribbon bar, you’ll find from left to right:
- A brief description of the place, and a list of all the Bible verses where it’s mentioned (you can click the … to see more). Biblical Places knows when the same place has different names, and where two different places have the same name. So if you select Jerusalem, Logos also includes references to the City of David that refer to Jerusalem, but doesn’t include the references to City of David that refer to Bethlehem.
- A list of all the dictionary articles about that place
- Other relevant links (to related places, people or things; to Wikipedia; and to Google maps)
- An overview of the map currently displayed in the main window
In the bottom ribbon bar you’ll find from left to right:
- Thumbnails of interactive Logos maps that mention the place
- A thumbnail of the special interactive Biblical World Map
- Thumbnails of Logos InfoGraphics that are related to this place
- Thumbnails of static maps and images from many resources in your library that are related to this place
If you can’t see all this on your screen, click the small left and right arrows at the end of the ribbon bars to scroll, or maximize the window to make it bigger. You can hover over any of the thumbnails in the bottom bar, to see a preview. Then just click to have it shown in the main window. (In the Biblical People tool, the maps are replaced by Family Trees and other diagrams showing the relationships between people.)
If you can’t see the image or map very well, you can use the ‘Actual Size’ and ‘Fit’ buttons at the top of the screen to change the zoom level, or you can use the mouse-wheel to zoom more precisely. If the map or image is bigger than the window, you can grab it to scroll around. If you want to use the map or image elsewhere, you can right-click on it to copy, save, print or send it to Powerpoint.
Interactive Maps vs. Static Maps
You’ll notice from the list above that there are two types of maps shown, and understanding the different will prevent much head-scratching later. On the left are interactive maps, sometimes called dynamic maps. These were created especially by Logos for the Biblical Places tool. On the right are static maps, which come from other resources in your library. What makes interactive maps so much better than static maps is that with interactive maps:
- You can zoom right in and still have fantastic quality
- You can hover over any of the place names to get a brief description
- You can click on any place name to switch Biblical Places to focus on that place
- You can open Google Maps to any location on the map (and therefore get a contemporary satellite view, or see what modern towns are nearby)
- You can use the Find Tool (CTRL+F) to locate other places on the map
- You can measure distances between two points
Most places will have several maps, but there’s one interactive map that’s worth pointing out specifically. It’s the Biblical World map, and it’s always the right-most interactive map (the last one before the Infographics and static images/maps). The Biblical World map is important because it lists every place. As you zoom in, more and more detail is added, and it should be your map of choice when you want to see how a place relates to other places nearby, as in the screenshot below.

Let me finish by showing you how to measure distances between two places on any interactive map (there’s more information about the other features mentioned in the video below). All you need to do is hold down the CTRL button, then click the mouse button on the place you want to start calculating this distance from. Then, continue to hold the button and move the mouse around the map. The distance calculated as you do, in both miles and kilometres. You can see below that Gilgal is nearly 30 miles from Joppa.

If you never used the full power of Biblical Places, why not try some these features now? But this tutorial has explained only some of the great features available.
Mark Barnes is the pastor of Bethel Evangelical Church in Swansea, UK, and author of the Unofficial Tutorial Videos for Logos 4.